Using ssh as a SOCKS proxy on Mac OS X
Introduction
Many times it can be convenient to tunnel your web traffic through a proxy, particularly an encrypted one. This web page shows how to easily tunnel your traffic through an ssh-encrypted proxy on Mac OS X. This allows your traffic to traverse your local network without being visible to snoopers, even when visiting unencrypted sites.
It also allows you to appear to come from a different IP address, allowing you to defeat geolocation schemes. In particular, some credit card processors try to make sure that your credit card billing address is correlated with your IP address, which can be hard on us expatriates. Another example is the free credit report web site which doesn't seem to work from outside the United States. There are undoubtedly many other practical, legitimate uses for this sort of redirection.
What you need
A stock copy of Mac OS X, plus one copy of Firefox. Oddly, the ssh client that ships with Mac OS X only supports the SOCKS4 protocol, but Safari only supports SOCKS5. Rather than play around with other ssh clients, we'll simply use a browser that speaks SOCKS4.
NOTE: The above comment is false as of Tiger (10.4), and may be false for 10.3.9 as well. Tiger's ssh and Safari get along swimmingly. This means that you can set up the ssh SOCKS proxy as described here, then configure it as a SOCKS proxy in System Preferences to have Safari and various other applications use it automatically.
You also need a shell account on another computer. This shell account will need ssh access. This is almost a given at this point in time, but you never know if there are some people out there who are still using telnet exclusively.
Setup
First, open Terminal and run the following command:
ssh -D 2001 user@host.comThe -D 2001 tells ssh to set up a SOCKS4 proxy on port 2001. Replace user@host.com with your actual username and remote host information, of course. Log in, and your SOCKS4 proxy is set up and ready to go. Note that you need to stay logged in to your shell for as long as you intend to use the proxy.
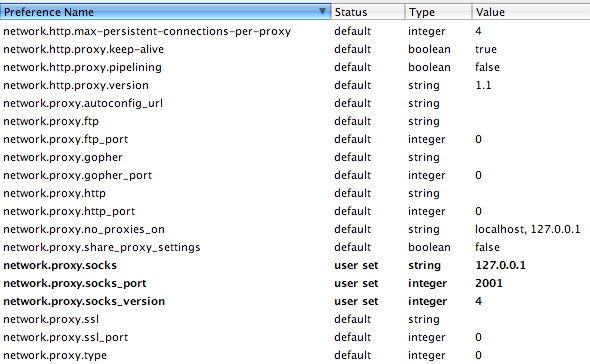
Next, open Firefox. In Firefox's address bar, enter about:config. You'll get a ton of configuration options. To narrow it down some, type "proxy" into the filter box at the top. You should get a list like this:

Set all of the items in bold to exactly what you see in the screenshot. For those of you who can't see the screenshot, set the following:
| network.proxy.socks | 127.0.0.1 |
| network.proxy.socks_port | 2001 |
| network.proxy.socks_version | 4 |
These settings configure your SOCKS4 proxy, but don't actually switch it on. This means that you can leave them set permanently, and they won't affect your connection unless you want them to.
To make Firefox actually use the proxy, make one final change: set network.proxy.type to 1. Then go to http://www.whatismyip.com/ to test. If it worked, you should be seeing the IP address of your remote shell host. Compare with its value in Safari if you're unsure.
If you want to use Firefox without the SOCKS4 proxy, simply reset the last setting: set network.proxy.type to 0.